A properly rolled joint can make or break a smoke sesh. Even your best friends won’t be able to mask their disappointment if you bring out a crooked joint that will struggle to get an even burn, wasting your precious herb.
Luckily, rolling the perfect joint isn’t that hard. All you need to do is to follow this step-by-step guide and take a look at our tips before you’re rolling joints like a pro.
Let’s get started!
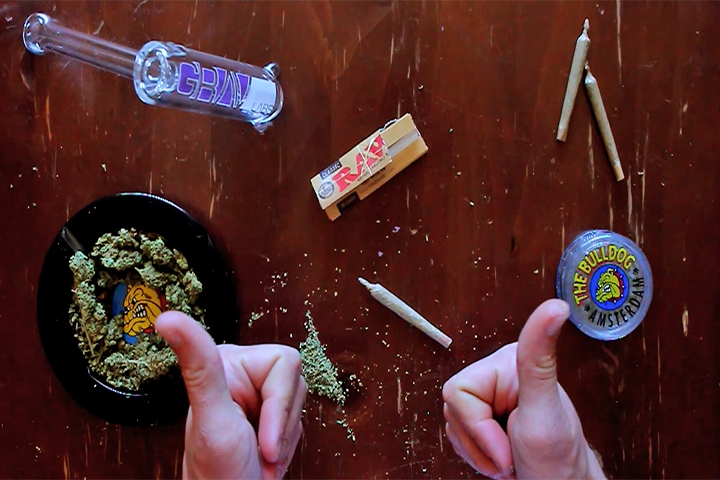
Necessary Tools and Materials
Here’s what you’ll need to roll a good joint:
- High-quality dry herb: Your herb is the heart of your joint, the better the herb, the better the joint.
- Grinder: A grinder is vital if you want a consistent grind for even burning.
- Rolling papers: From 1 ¼ to king size papers, you can find rolling papers in all sizes and flavors.
- Filters or crutches: Filters or crutches add structural integrity to your joint, enhance airflow, and prevent herbs from reaching your lips. Roll your own or get pre-made ones to roll faster.
- Rolling tray: A rolling tray allows you to keep everything tidy and organized as you roll your joints
Step-by-Step Guide to Rolling a Joint
Here’s a simple tutorial to rolling a good joint:
Step 1: Preparing the Herb
The first thing you need to do is to grind your herb to a coarse and even grind. Use a grinder to get perfectly ground cannabis to ensure a smooth burn and maximize the release of the herb's flavors.
Step 2: Making a Crutch/Filter
Take a strip of sturdy paper, like from an index or business card, fold it into an accordion shape to add structural support, and roll it into a compact cylinder. The crutch not only enhances stability but also improves airflow, prevents herbs from reaching your lips, and adds a touch of sophistication to your joint.
Step 3: Ready the Paper
Lay a joint paper flat in your chosen rolling tray, ensuring the gum strip faces up. The rolling tray provides a clean and flat surface, catching any loose ground flower so you can add them later to the rest of the joint.
Step 4: Packing the Herb
Carefully place and shape the ground cannabis onto the rolling paper. Evenly spread the herb, leaving enough room at the ends for tucking.
Step 5: Tucking and Rolling (50+ words)
This is the trickiest part. Utilize your thumbs and index fingers to shape the joint, achieving the right cylindrical shape and tightness. Take your time with this step, as it defines the overall appearance and functionality of your joint. Then, carefully tuck the end of the paper into the joint, so you can close and roll the joint.
Step 6: Sealing the Joint
Sealing the joint is the final touch. Lick the gum strip and carefully seal the paper, securing your creation. Twist the open end of your joint shut, and push the filter into the joint so it’s not sticking out and to help finish packing the ground weed inside.
Different Styles and Techniques
Looking to roll a more unique joint? Here are a few ways to upgrade your rolling technique:
Cross Joints
Cross joints are very popular, although a bit tricky to roll. Start by rolling two joints: a regular joint and a second joint that is slightly thinner and longer. Carefully poke a hole through the middle of the first joint using a pen or other slender object.
Then, insert the thinner joint through the hole, forming a cross shape. Seal the joints together securely. You can use gum strips cutting excess paper to easily seal the joints.
Here’s a guide on how to roll a cross joint to learn more!
Pinners
Pinners are smaller joints that are perfect for smoking small amounts. To do it, opt for a smaller rolling paper and grind a minimal amount of herb for a slender joint. Roll the paper tightly, ensuring a thin and elegant appearance, and seal the joint carefully, paying attention to the tightness.
Spliffs
Spliffs combine tobacco with cannabis, giving you unique smoke and added nicotine. To roll one, simply combine cannabis with tobacco in the rolling process, adjusting the ratio based on your personal preference.
You might want to use a slightly larger rolling paper to accommodate the mix. So you can roll as you would a regular joint.
Learn more about spliffs here!
L joints
L joints are larger than normal, making them perfect for groups. Start by rolling a standard joint with a crutch and extend the length of the joint by attaching an additional, smaller joint at a right angle. Then, simply ensure a secure connection between the two joints with some gum strips.
Inside-out Joints
Looking for a purer taste? Roll an inside-out joint by placing the paper gum-side down and applying the ground herb in a line along the paper. Then, roll the joint, sealing it without exposing the gum, and tuck or burn any excess paper.
Tulip Joints
Tulip joints are nove, larger joints that hold more cannabis flower. Begin by rolling a cone-shaped joint and create a small hole at the tip. Then, insert a rolled-up paper or thin cardboard into the hole. The cone shape at the top will resemble the tulip's blossom in a beautiful joint that can pack more material.
Tips for Rolling the Perfect Joint
Rolling the perfect joint is an art that improves with technique and experience. Here are some essential tips to elevate your joint-rolling game:
- Always use a grinder: Grinders ensure a consistent and even grind, helping you get a smoother and more enjoyable smoking experience.
- Start with thick papers if you’re a novice roller: Thicker rolling papers provide more stability and are easier to roll for beginners. As your skills develop, you can experiment with different paper thicknesses.
- Don’t overstuff your joints: Balance is key. Avoid overstuffing to make it easier to roll and ensure the joint burns evenly
- Practice and patience: Like any skill, joint rolling improves with practice. Be patient, experiment with techniques, and find what works best for you.
- Consider pre-rolled cones or joint rollers: If you find rolling challenging, pre-rolled cones or joint rolling machines can help you out!
Conclusion
Rolling a perfect joint isn’t hard, it’s all a matter of practice! Nobody rolls a perfect joint the first time. Just gather your rolling papers and your filters, and keep practicing. And, remember, you can always simply get pre-rolls or edibles if you want to skip the rolling process!
Joint Rolling FAQs
Here are answers to common questions about rolling joints:
How much weed is in a joint?
The amount can vary, but a standard joint typically contains around 0.5 to 1 gram of cannabis. If you’re buying a pre-roll from a dispensary, they would usually be weighed and labeled with their exact contents.
What are the different ways to roll a joint?
There are various styles, including the basic joint, cross joints, pinners, spliffs, L joints, inside-out joints, and tulip joints. Each offers a unique smoking experience and visual appeal.
How does a joint compare to blunts and spliffs?
Joints consist solely of cannabis, while blunts use tobacco or hemp wraps, and spliffs combine cannabis and tobacco. Joints tend to offer a purer cannabis experience, while blunts and spliffs can alter the effects.
Is it necessary to use a filter in a joint?
While not mandatory, using a filter tip at the end of the joint offers structural support, improves airflow, and prevents herb from reaching your lips. Filters enhance the overall smoking experience and are widely preferred by many smokers.

Adam Frost - Content Specialist - LinkedIn
I've been a digital content expert in the cannabis space for over 6 years, producing curated content for a wide range of businesses within the cannabis industry. In my spare time, I enjoy hiking, skiing, hanging out with dogs and playing drums in the Denver-based thrash metal band Condemned to Burn.